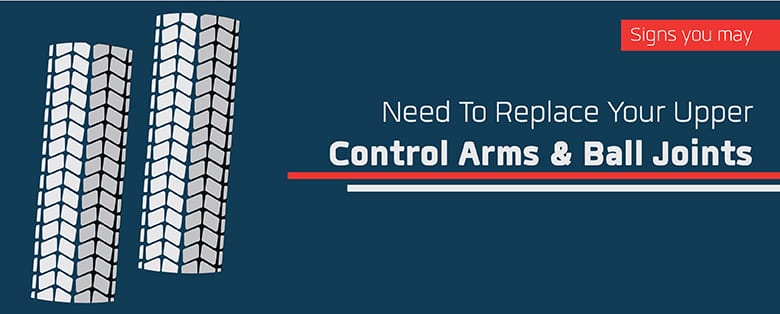
If you’re starting to detect some shimmy and play in the front end of your 2004-2008 Ford F-150 pickup or noticing uneven tire wear, the ball joint and upper control arm in your truck may be responsible. As your ball joints wear, they allow more and more play, and at a certain point, they need to be replaced. Replacing your ball joints and upper control arms at home is possible with a few simple tools and some expert tips.
Quick Links:
Before you start replacing your F-150 pickup ball joints, make sure you have all the necessary tools. To replace your ball joints, you’ll need:
Tools Needed:
- Jack
- Jack stands
- Socket wrenches and extension
- 30, 24, 22, 21, 19, 18, 15 & 13 mm sockets
- 22, 19, 15, 9, 8 mm open-ended and box-ended wrenches
- Pneumatic impact wrench and socket extension (optional, but helpful)
- Breaker bar for added leverage
- Torque wrench
- Vice grips
- Needle-nosed pliers
- Adjustable crescent wrench
- Flat-bladed screwdrivers (for prying)
- Small hammers (rubber mallet may work as well)
- Crowbar
- Grease gun and grease
- Drift (for shock bolts)
- Ball joint press
- Air compressor and hose
- Box/cooler (for placing brake caliper once removed and keep it from dangling)
- Heat source (optional, but helpful)
Parts and Other Materials Needed:
You will also need the following parts:
- Lower ball joints
- Upper control arms
These parts should be specific to your truck’s make, model, and year. Pay careful attention when purchasing your replacement ball joints, as different model numbers may exist for different years of Ford trucks, even if they look identical.
Steps to Replace Your Ball Joints and Control Arms
As with all automotive repair and replacement projects, it’s always a good idea to give yourself lots of space when replacing your ball joints. Clear away all unrelated parts and tools and make sure you have adequate lighting available.
These are the steps you’ll need to follow to remove your Ford F-150’s old worn ball joints and install new ones:
-
-
Start to loosen the lug nuts on the tire you will be removing. You may need to use a breaker bar for additional leverage.
-
Raise your truck on a hoist or lift, and place jack stands under the frame.
-
Remove the lug nuts and the wheel.
-
Remove the wheel bearing dust cap in the center of the wheel assembly using a flathead screwdriver.
-
Remove both 18 mm bolts on the back of your brake caliper.
-
Carefully remove the brake caliper, taking care not to apply too much pressure on the hoses. Place the caliper on a box, cooler or upside down bucket, so the hose isn’t stretched or stressed.
-
Slide off the brake rotor disc.
-
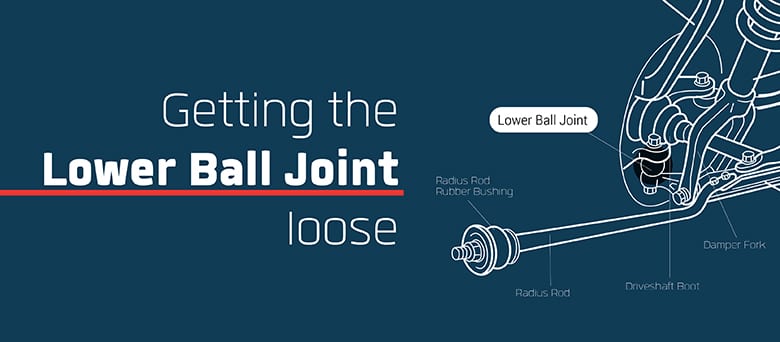
Remove the lower ball joint nut, located at the bottom of the wheel hub assembly below the ball joint, using a 24 mm socket and breaker bar.
Tip: You made need to apply extra leverage with a long pipe.
-
-
-
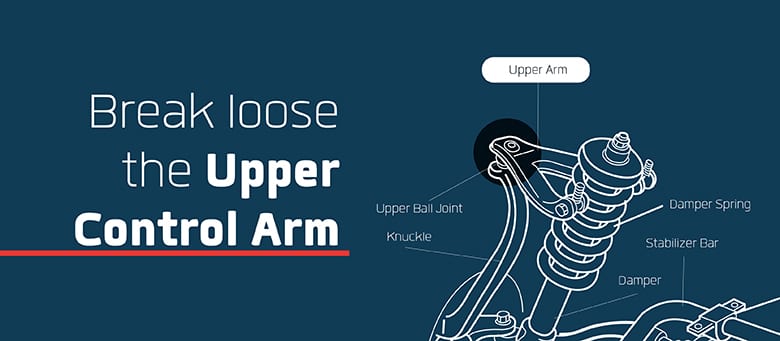
Remove the upper control arm by removing the bolt located on the underside of the upper ball joint in the control arm using a 21 mm socket and breaker bar.
-
-
-
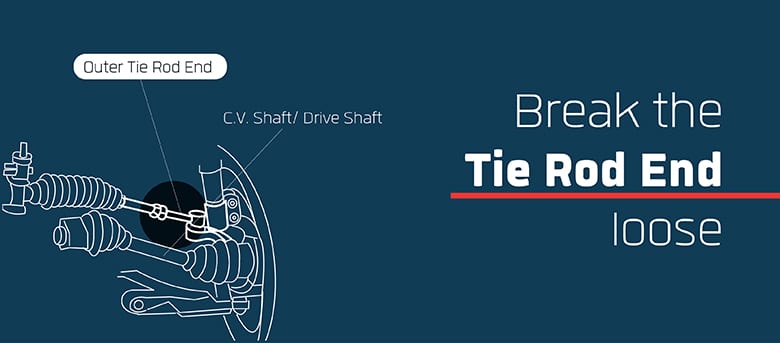
Remove the tie rod end bolt located on the top of the tie rod end, where it attaches to the wheel hub assembly using an 18 mm socket and breaker bar.
-
-
-
Remove the tie rod end shaft using a hammer or mallet — gently hammer from the top to remove it toward the bottom.
-
Heat the bottom ball joint and use a combination of hammering and prying to separate the ball joint from the wheel hub assembly — this can be difficult!
-
Remove the upper ball joint using a hammer — hammer from the top to remove it toward the bottom.
-
Remove the nut holding the wheel hub assembly to the axle using a 13 mm socket and impact wrench.
-
Carefully remove the control arm and wheel hub assembly to avoid putting stress on any lines or wires and place it on the box with the brake caliper.
-
If your truck is equipped with 4×4, swing the front drive axle to the side to make room.
-
Remove and replace the lower ball joint:
-
-
Remove the C-clip from the upper side of the bottom ball joint using needle nose pliers.
-
Use the ball joint press with the correct collets to push the old ball joint down through the lower control arm.
-
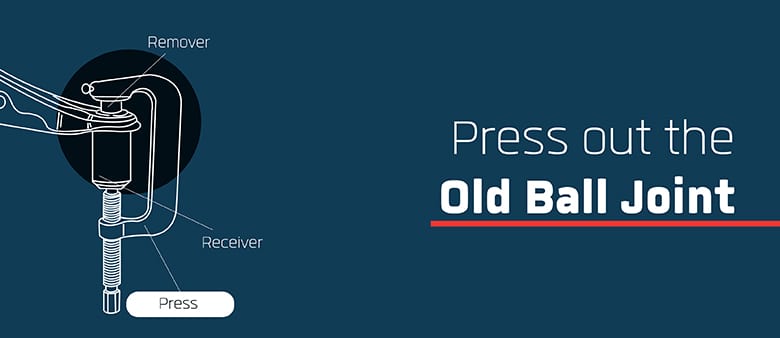
-
-
Use the ball joint press with the correct collets to push the new ball joint up through the lower control arm.
Tip: You will need to stop about halfway through and add an additional collet spacer on top to fully press the new ball joint in place.
-
Reinstall the C-clip in the top of the new ball joint using needle nose pliers.
-
Remove and replace the control arm:
-
-
Remove lower control arm shock bolt — located at bottom of shock — using 30 mm socket and breaker bar.
-
Remove three upper control arm nuts. They are located at top of shock tower — two on the front, one on the rear — using 15 mm socket and breaker bar.
-
Remove the last control arm bolt visible at the top of the shock tower.
Tip: This will be easier to access from inside the engine compartment.
-
Lower the shock out of position using a hammer, taking care not to let the shock drop to the floor.
-
Remove the two upper control arm bolts using a 21 mm wrench and remove the control arm.
-
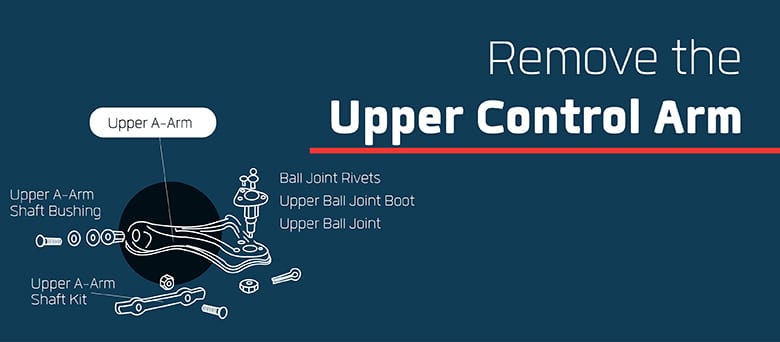
-
-
Install the upper control arm in the reverse order of removing it. Be sure to apply grease to the grease fittings before you start to put everything back together.
-
Putting your truck back together:
-
Refer to repair manuals/owners manual/online sources for the correct torque specifications for all bolts and nuts.
-
Reinstall the wheel hub assembly taking care not to stretch the hoses or wires.
-
Reinstall the brake caliper taking care not to stretch the hoses.
-
Reinstall your wheel and torque to the right lug nut specification.
We recommend having an alignment done on your truck after you replace your ball joint and control arm. After that, your Ford F-150 is ready to put back in service! Following these steps in order allows you to replace your ball joints and control arm with as little hassle as possible and means you can avoid costly charges from a repair shop.
After this repair, if you still find that your F-150’s handling and feel leaves something to be desired, you may want to try replacing your factory bushings with prothane polyurethane bushings.
If you have any questions, you can always contact our team here at Raybuck. We’re happy to help and give any additional tips and pointers to assist you in the repair of your 2004-2008 Ford F-150 ball joints and control arms, or replacing your truck’s bushings.
Do you have any tips for replacing the upper control arm and lower ball joint on your F150? Share them in the comments below!
Love it! Nicely done.