Rust never sleeps. Left unchecked, it eats through structural steel, compromises safety, and slashes resale value. Replacing small sections now is almost always cheaper than waiting until the damage spreads. At Raybuck Auto Body Parts, we specialize in direct‑fit rust‑repair panels stamped from heavy‑gauge steel, so even first‑time DIYers can restore strength and appearance without paying shop rates. Our catalog covers vehicles dating back to the 1940s and ships free on most U.S. orders over $189.
Key Takeaways
- Identify rust early to determine whether to grind, patch, or fully replace a panel before structural damage worsens.
- Raybuck’s heavy-gauge steel panels offer superior durability and fit compared to typical aftermarket options, making DIY repairs more reliable.
- Proper prep and tools—including weld-through primer, MIG welding gear, and safety equipment—are essential for a lasting, seamless repair.
- Step-by-step installation guidance ensures accurate alignment, strong bonding or welding, and rust-resistant sealing.
- Ongoing maintenance like undercarriage rinses, paint touch-ups, and yearly rustproofing helps preserve your vehicle long after the repair.
Surface rust is just the start—scale rust bubbles paint, and penetrating rust eats holes from the inside. Know the difference before you cut.
Benefits of Using Rust Repair Panels
Rust repair panels offer a practical, cost-effective solution for restoring your vehicle’s structural integrity and appearance. Instead of replacing entire body sections or making temporary fixes, you can use repair panels to address only the affected areas. This approach saves both time and money, making it ideal for DIYers and professionals.
One of the main benefits of using rust repair panels is preserving your vehicle’s safety. Rust spreads quickly and can compromise the safety and resale price of your car or truck. By addressing rust early with high-quality repair panels, you prevent further damage. This intervention is important for classic cars, trucks, and work vehicles, where authenticity and durability are essential.
Rust repair panels are designed for a precise fit, matching the contours, body lines, and mounting points of your specific vehicle. You’ll spend less time on modifications and get a more seamless final result.
Another advantage is accessibility. With the right tools and some basic skills, many vehicle owners can install these panels themselves, avoiding expensive body shop labor. Step-by-step guides and customer support make the process even more approachable.
Panel replacements provide reliable, long-lasting fixes that restore both the look and function of your vehicle, all while keeping costs manageable.
Understanding the 3 Stages of Vehicle Rust
- Surface rust – cosmetic oxidation that hasn’t penetrated the metal.
- Scale rust – pitting reaches deeper; paint bubbles or flakes.
- Penetrating rust – full perforation, often hidden on the back of panels or inside seams.
Common hot spots include rocker panels, cab corners, lower door skins, wheel arches, and bed floors, because they trap moisture, salt, and debris. Identifying the stage accurately guides whether you’ll grind, patch, or replace an entire panel.
Inspecting and Assessing Damage
- Tools: flashlight, inspection mirror, body pick, and—if available—an inexpensive borescope.
- Probe from both sides whenever possible; rust often starts inside and works out.
- Determine scope: A quarter‑size hole in an otherwise solid panel can take a small patch. Multiple perforations or widespread pitting usually justify a full replacement.
- Match your skill level: MIG welding thin automotive steel takes practice. Adhesive‑bonded panels are an option, but structural areas (rockers, cab mounts) deserve welds. Factor in time for grinding, sealing, priming, and painting—the end‑to‑end job rarely finishes in a single afternoon.
Types of Rust Repair Panels
Rust can attack almost any part of a vehicle’s body. Certain areas are more vulnerable due to their exposure to moisture, road salt, and debris. To address these problem spots, manufacturers offer a variety of rust repair panels, each designed for a specific location and purpose.
Some repair panel options include:
- Rocker panels run along the lower edge of the vehicle between the wheel wells. They provide structural support and are often the first to rust, especially when exposed to harsh weather.
- Cab corners are the rear lower corners of a truck’s cab. This spot is another common rust zone due to trapped moisture and dirt.
- Floor pans form the base of the vehicle’s interior. They can rust from the inside out, especially if water leaks go unnoticed.
- Wheel arches are the curved sections above each tire. They take a beating from road spray and salt, so they’re prime candidates for rust repair.
- Truck bed panels and bed floors are also frequently replaced. They go through heavy use and exposure to the elements.
Each type of panel is engineered to match the original shape and fit of your vehicle, providing a smooth installation and a factory-like finish. Some panels are full replacements, while others are partial “patch” panels designed to cover only the damaged area. By selecting the right type of rust repair panel, you can restore your vehicle’s strength and appearance.
Choosing the Right Rust‑Repair Body Panels

Not all aftermarket steel is created equal. Our panels are stamped from 18‑ to 20‑gauge steel, often thicker than OEM sheet (20‑ to 22‑gauge). Heavier steel resists warping during welding and stands up to road abuse.
| Panel Location | Typical OEM Gauge | Raybuck Gauge* | Practical Benefit |
| Rocker panel | 20–22 GA | 18–20 GA | Stronger weld flange, less distortion |
| Cab corner | 20–22 GA | 18–20 GA | Better dent resistance |
| Bedside/Bed floor | 18–20 GA | 18 GA | Matches or exceeds factory, ideal for hauling |
Other selection tips:
- Vehicle‑specific stamping: Holes, body lines, and flanges match factory parts—no guesswork.
- Catalog depth: From ’40s classics to today’s trucks, we stock patch panels that others don’t.
- Budget protection: Free ground shipping on qualifying orders keeps the total project cost predictable.
Tools, Materials and Safety Gear
Essentials
- Angle grinder or cut‑off wheel
- Step drill bits for plug‑weld holes
- Body hammer and dolly set
- Sheet‑metal flanging tool & cleco clamps
- MIG welder (0.023–0.030‑inch wire) or two‑part panel‑bonding epoxy
- Seam sealer, weld‑through primer, rust converter
Personal Protective Equipment
- Nitrile‑coated gloves for grip without bulk
- Auto‑darkening welding helmet, safety glasses, and ear protection
- NIOSH‑approved respirator when grinding or spraying primer
Prep Work: Removing the Rusted Metal
- Mask the surrounding paint to avoid accidental scuffs.
- Mark cut lines at least one inch beyond visible rust; metal discolors internally before perforating.
- Make the cut with an abrasive wheel, keeping sparks away from glass and wires.
- Clean edges to shiny steel; treat adjoining metal with a phosphoric‑acid rust converter.
- Test‑fit the new panel, trimming until gaps are no wider than 1/16 inch for welding or a consistent 1/8 inch for adhesive overlap.
Step‑by‑Step Installation Guide
- Final fit: Clamp the new panel in place; ensure body lines flow uninterrupted.
- Mark plug‑weld locations: Every 1.5–2 inches along the flange simulates the factory spot-weld pattern.
- Drill or punch 5/16‑inch holes through the replacement panel’s flange only.
- Apply weld‑through primer where metal will overlap; skip this if using panel‑bonding adhesive.
- Secure with clecos or locking pliers so the panel sits flush
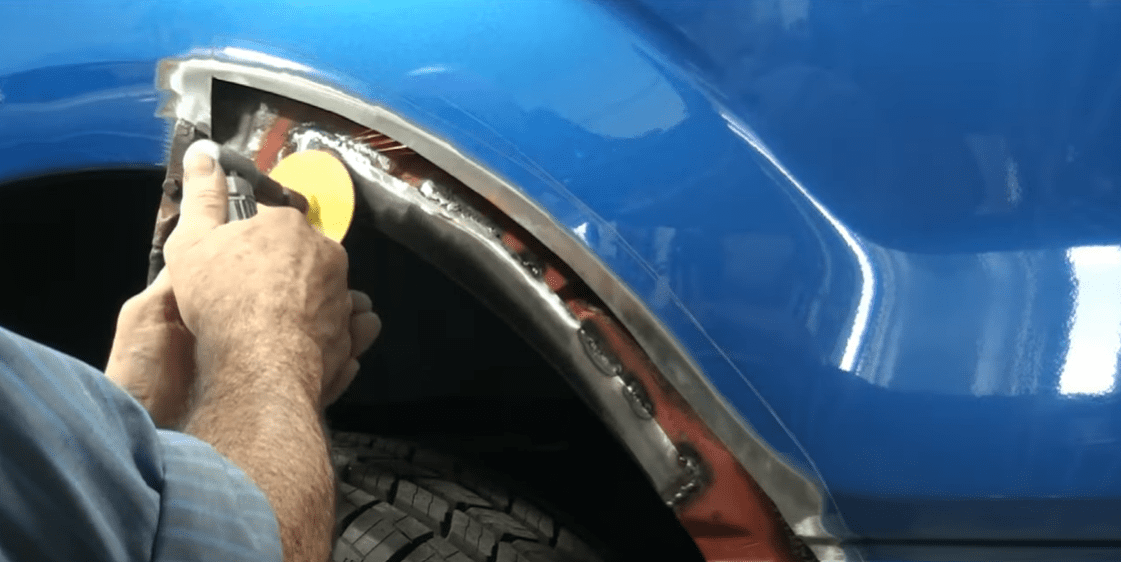
- Weld in a staggered stitch, one‑inch beads spread out to limit heat. Jump around the perimeter, pausing to cool metal with compressed air.
- Grind welds flush with a flap disc, checking that you haven’t thinned the steel.
- Seal all seams on both sides. Brush‑on seam sealer inside the rocker or cab corner to keep future moisture at bay.
- Adhesive method: If bonding, lay a continuous 3/8‑inch bead on the mating flange, clamp firmly for the manufacturer’s recommended cure time, then remove squeeze‑out before it hardens.
- Structural check: Doors should close without rubbing, and gaps should match the opposite side.
Finishing Touches
- Spray two coats of epoxy primer over bare steel within 24 hours.
- Feather edges, apply a skim of filler only if body lines need tidying, then block‑sand.
- Follow with a high‑build primer, guide‑coat, wet‑sand, and apply color/clear per paint‑system specs.
- Finally, undercoat the backside and inject cavity wax through factory access holes to encapsulate seams.
Long‑Term Rust Prevention Tips
- Rinse undercarriage and wheel wells after salty winter drives.
- Touch up stone chips before they sprout corrosion.
- Reapply an oil‑based rust‑proofing or wax annually, concentrating on seams and panel joints.
- Park on dry surfaces and allow the chassis to cool before closing the garage to reduce condensation.
The Raybuck Auto Body Parts Advantage
Whether you need rocker panel repair or cab corner replacement, we have what you’re looking for. Every panel we ship is backed by real‑world enthusiasts who answer the phone, not a scripted call center. Need help measuring a cab corner or choosing an adhesive? Talk to our in‑house tech team at 888.789.7409 — we’ll walk you through it.
Find Rust Repair Body Panels Near You
Quality steel, careful prep, and sound technique turn rusty nightmares into show‑ready sheet‑metal. Measure twice, order the right Raybuck Auto Body Parts panel, and tackle corrosion before it spreads. Your driveway can double as a body shop—and we’re here with parts, guidance, and fast shipping when you’re ready to begin.
Restore your vehicle with confidence—shop high-quality rust repair panels and get expert support every step of the way.
Further Reading
- How to Prevent Exterior Rust: AutoZone provides practical tips on maintaining your vehicle’s exterior to prevent rust, emphasizing regular washing, waxing, and prompt touch-ups of scratches.
- How To Prevent Rusting on Cars (The 7 Best Ways): The Car Investor outlines seven effective methods to prevent rust, such as keeping the car garaged, applying underbody sealants, and regular inspections.
- How to Repair Rust on a Car: Family Handyman offers a straightforward guide on removing rust from your car, including sanding techniques and painting tips to restore your vehicle’s appearance.


