
Your headlights allow you to see the road clearly at all times. If you don’t adjust them properly, however, they can’t do their job. Improper headlight alignment can blind other drivers and make it harder for you to see.
You might need to fix your headlight alignment if:
- You replaced your headlights
- Your vehicle was in a collision
- You’ll be carrying more weight than usual
Before you drive your vehicle at night, you should make sure the headlights are aimed properly. You can adjust them using this simple process and tools that you already have.
Tools and Materials You’ll Need
To adjust your headlights, you’ll need a ratchet or screwdriver that matches your vehicle’s headlight adjusters. Headlight adjusters are in different locations on every vehicle. You can check your owner’s manual to find them or look for the adjustment screws adjacent to or behind the headlight. Once you know what kind of screws your vehicle has, you’ll be able to choose an appropriate tool.
In addition to a ratchet or screwdriver, you’ll also need:
- A measuring tape
- A dry erase marker
- Painter’s tape
- A wall or flat surface
- A piece of cardboard or jacket thick enough to block light
- At least 25 feet of space
Steps to Aim Your Headlights
For you to properly align your headlights, your vehicle should be on level ground. You can adjust your headlights inside or outside using this step-by-step process:
- Prepare your vehicle: Make sure your tires are filled to the appropriate air pressure and that you have around a half tank of gas (the weight of the fuel will adjust the vehicle’s stance, and you’re more likely to have between 1/4 and 3/4 tank of gas than you are an empty or full tank). If you regularly carry around heavy equipment or supplies, place them in the vehicle as well.
- Find the headlight axis: With a dry erase marker, draw a small dot in the center of each headlight. This is the headlight axis. Make sure to mark the center of the regular lights, not the high beams.
- Park your vehicle: Park your vehicle right in front of a level wall or flat surface — this could be your garage wall, garage door or a wall in a parking lot. You should have enough room to back up 25 feet in a straight line from the spot.
- Jounce the suspension: Bounce the vehicle a few times on all four corners to allow the suspension to settle.
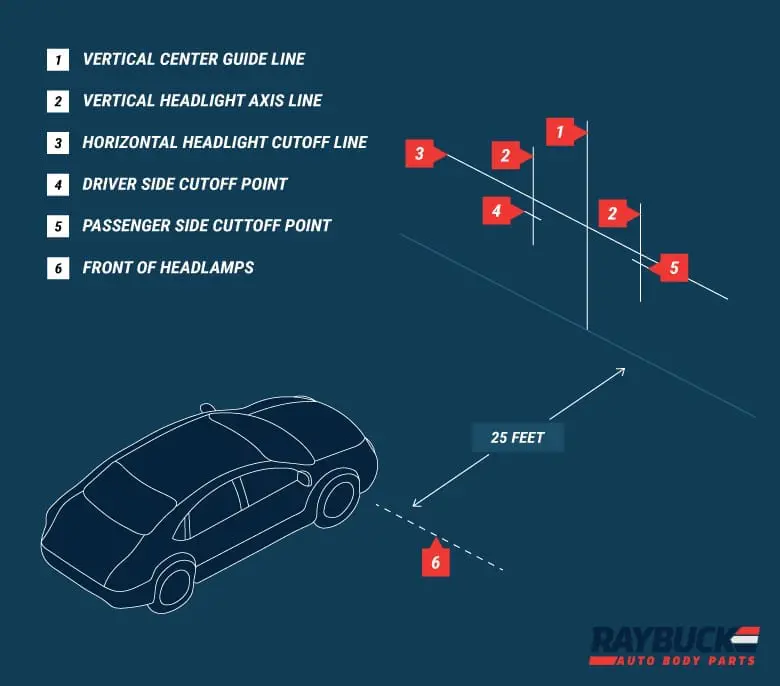
- Create a center guide: Using a piece of painter’s tape, put a vertical mark on the wall or garage door in line with the center of your vehicle. Don’t worry about precise measurements — this mark will just serve as a guide. A hood ornament or front license plate can be helpful for determining this.
- Mark the headlight axis on the wall: Place a vertical strip of painter’s tape on the wall in front of each headlight axis. The axis dot should line up with the center of the tape.
- Measure the height of the headlight axis: Using your measuring tape, measure from the ground to the headlight axis, using the dot as a guide.
- Mark the height of the headlight axis on the wall: Measure up the wall and make a mark on the tape at the height of the headlight axis.
- Find the headlight cutoff lines: On the driver’s side of the wall, measure four inches below the axis height you marked and draw another line. On the passenger’s side, draw a line two inches below the axis height. These marks will serve as cutoff points when you adjust your lights. The driver side mark is lower than the passenger side mark to reduce the glare seen by oncoming drivers.
- Mark the headlight cutoff lines: On each side of the wall, place a horizontal strip of painter’s tape above each cutoff line, making sure it’s level. The bottom of the tape should line up with the drawn cutoff line. This step makes it easier to see the cutoff from a distance.
- Back your vehicle up: You’re ready to adjust your lights now. Back your vehicle in a straight line away from the wall. The front of your headlights should be 25 feet from the aiming wall chart you’ve created.
- Turn on your lights: Turn off your garage lights or any other light source and turn on your vehicle’s headlights to compare their alignment to the guide. If you’re adjusting your headlights outside, you’ll need to do this work at night.
- Adjust your headlights: Use a piece of cardboard or a jacket to block one headlight. Then, use your ratchet or screwdriver to turn the other light’s vertical adjuster screws, being careful not to lean on the vehicle. Turn the screw clockwise or counterclockwise until the top of the light lines up with the bottom of your adjustment chart’s cutoff line. When the lights are aimed properly, everything above the horizontal tape will be dark. Repeat the process on the other side. If you notice that your lights are horizontally out of alignment, follow a similar process using the horizontal adjustment screws, to adjust them back to center.
- Check the alignment: Remove the cardboard or jacket from the covered headlight and check the finished alignment. The beam from the driver’s side headlight should sit a bit lower than the one from the passenger’s side. This setup gives you proper visibility without blinding other drivers.
- Test your lights: After you’ve set your headlight alignment, take your vehicle out for a test drive to make sure the lights provide proper visibility.
Final Words on Headlight Adjustment
Correctly aimed headlights allow you to drive safely. This headlight adjustment method is easy enough for anyone to do at home. However, since all vehicles are different, you should check your owner’s manual before adjusting your headlights, since some manufacturers require different measurements. Also, remember that you may need to adjust your fog lights or high beams separately, depending on your vehicle. You can use the same adjustment process to aim these lights as well.
If you have questions about aligning your headlights, you can always contact the team at Raybuck. We’d be happy to provide additional tips for your vehicle’s make and model.
Shop Headlight Assemblies & Parts »


Do you have any guide or measurement for horizontal alignments?
Very detailed directions. Are you talking about high beams or low beams. Should they be the same?
It’s the same. You can adjust with the low beams, and then check the high beams, but they should both be set from one adjustment.
This is the best explanation of how to do this, and talk about easy, it’s really easy.
I don’t understand why so many people are complaining. All they have to do is just take their time and follow your instructions.
I want to give you guys “PROPS” for making this so easy to do and to say
“THANK YOU”!
Okay. How about 87 square body. 4 lights-up and down—I’ve seen nothing on this configuration
i need to know what tool is requiredto adjust the high beam headlight on my 2009 mazda cx9
i thought the right headlamp is suppose to aim straight forward and the left is to aim towards the right
Thanks Steve! I followed your directions and found it EASY and I didn’t even have to use geometry calculations like some other commenters! lol I recently upgraded my bulbs to HDI and replaced my old yellow lenses. I eyed it and put the new ones as close to the same position as I could, but soon found all oncoming traffic blinking their lights at me. Your video got me all squared away and it was very detailed and easy to follow. ??
EASY? If you’re a geometry or any kind of math whiz, I can see how it might be EASY. I think I’d rather do a complete brake job, including resurfacing the drums and rotors myself.
I have a 2006 chevy trailblazer and I found the ajustment screw for raising and lower the beams where is the ajustment screw for vertical ajustments my headlights on low beam driver side shines way to the left
Thanks for the tutorial Steve, I could adjust my headlights easily following it!
Hello. I have a Hyundai Tucson 2016 and my LED headlights don’t shine like the H7 on my old car. I guess it will be in
incorrect setting. Can you advise me what the ideal height of the upper limit of the light beam of the right and what the left headlight should be at a distance of 3 meters from the wall of the car? Thank you very much, Jozef
Hi Jozef. We’ve seen a wide variation in LED lights. They are usually brighter than the H7s that they replace, but some are not. It may simply be the bulbs and not so much the angle of the headlights. Unfortunately I don’t have a specific setting to provide to you for the Tucson. I would suggest comparing the lumen output of the LED bulbs that you have to that of the H7 prior to making any adjustments.
[email protected]
I have a 2003 VW Jetta it was in a collision and was fixed the right way but only has one spot to adjust on the top is there any other spot to adjust? On the sides or lower?
Hi I have a 2008 volvo s40 with regular headlights I have two questions first one is if your turning it right does the light go left instead and the second one is what if you turn the knob and it dont seem like the light is moving what can you do?
Hi Randall. When you turn the a headlight adjuster screw to the right (clockwise), it will pull the headlight in towards the vehicle on that side. If you’re turning the adjuster screw and nothing is happening, it may be stripped out. I would suggest spraying some lubricant on the screws and the base that they screw into prior to adjusting. You can also try turning the opposite side screw in the opposite direction (counter clockwise) to see if the headlight moves.
For C30 (my car 09) and S40, it may be better to remove the lamp unit from the car, open the clip on cover then move the slide lever inside. I did this before fitting the new headlights, its in the manual, paper and PDF on line.
Another method is the 6mm and 8mm allen key sockets used for bench aligning, off the car.
There are 3 screws on a headlight my headlights are set for 13V and 19H when using the Hoppy headlight Aimer you set the V and H to these numbers but what’s got me is the top outside screw that is no adjustment where should that screw be at? If there is someone that can tell me how to set that screw I can do the rest.
Side adjuster on 2018 rav 4 I found the up and down secwe
I have a Toyota Corolla and it only has a vertical adjuster for the headlights. You don’t have a second adjuster to move the beam left or right to center it. So some cars won’t have anything but a screw to move the beam up and down but not left to right.
Do you have the measurements for headlights on a 1996 m998 Hummer or is the standard measurement good?
Hi Bob, sorry, we do not have the measurements for that vehicle.