About a year ago we decided that we should get a truck and repair it with as many parts that we sell as possible. In May of 2015 we found a 1953 Chevy 1/2 ton that was in need of some major TLC, and we thought it was perfect. It was perfect because we loved the truck, and we can get almost every non-mechanical item for it, including body, trim, glass, weatherstripping, seat cover, and carpeting. And so our journey began. (Scroll to the end of this article to see the build specs)
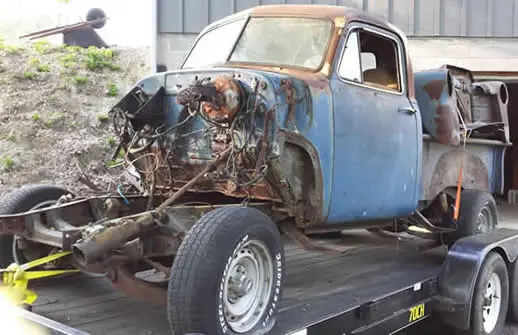
Day 1 – Strip it down
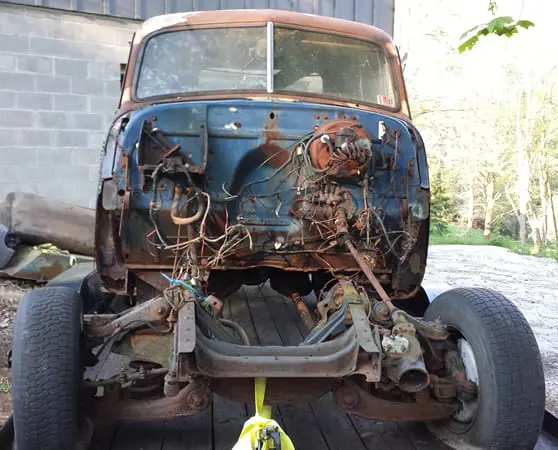
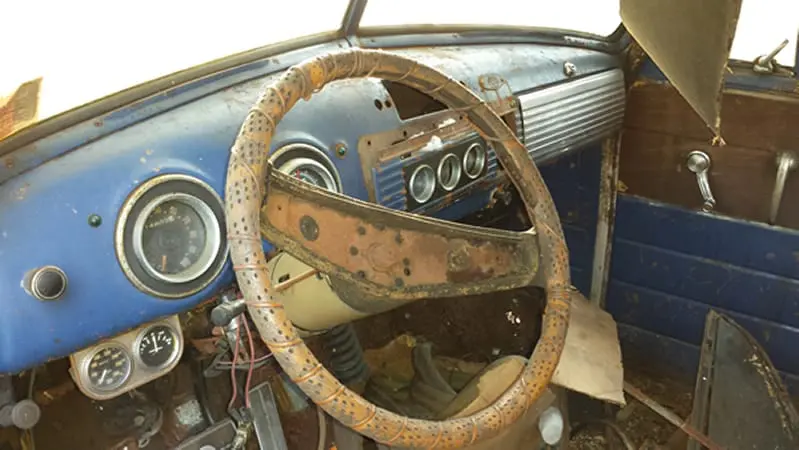
We pulled this fine piece of machinery out of a yard in Southwestern Pennsylvania where it had been sitting for 20 years, so needless to say, some animals had made it home. We spent the day cleaning it out, and removing many years worth of really bad “upgrades.”
Day 5 – Suspension Mockup
After a number of days of welding, grinding, repeat, we have most of the unused frame holes filled in, and the independent front suspension cross member mocked into place. We are using a Heidts Mustang II independent front suspension with 2″ drop spindles and a power rack.
Day 8 – Front Suspension Finish / Floor and Lower Cowl Replacement
We finished installing the crossmember and spring perches for the Heidts front suspension and started mocking up the rear leaf spring suspension. The truck still had its original rear suspension in place, so we removed it and swapped in a new set of leaf springs. We went with leaf springs instead of a 4-Link as we plan on driving the truck a lot and were more concerned with ride comfort than pure performance. The kit that we are using is a bolt-on, and it really does align with factory holes. We want the truck to sit about 8″ off the ground at the rear of the running boards, and we want to minimize the use of lowering blocks, so we may be revisiting the rear suspension mounts once we get a little further along.
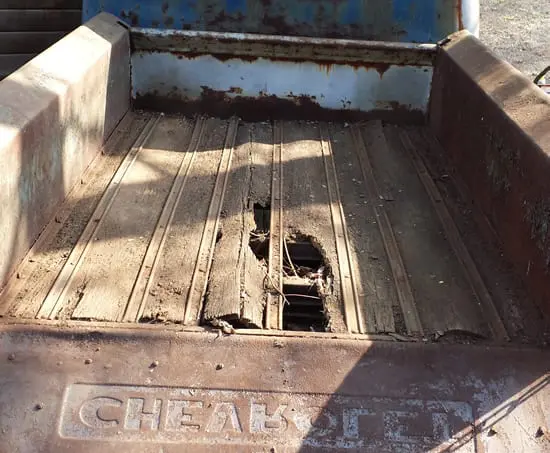
We decided to replace the front section of floor since it was fairly soft. While we’re doing this, we’re going to replace the inner and outer lower cowl areas, and kick panels as well since all of these areas had a lot of rot.
Day 14 – Paint Frame and Under Cab
We made it to the point where we can now paint the frame and the under side of the cab. It’s nice to see the old truck roll out of the garage, and to know that we’re getting much closer to being done with the rust. Somewhere in between Day 8 and Day 14 we finished the lower cowl panels, replaced the cab corners, and even replaced a large section of floor and seat riser around the driver area. The lower lip of the seat riser was pretty well gone just below the driver area, and we had intended on fixing it but could not find an original style seat riser on the aftermarket. We were lucky enough to find a donor vehicle that had a solid floor, so, after making the trek into the woods with a cordless sawzall and a few batteries, we ended up with a solid replacement.
For the frame and the under side of the cab, we ground off as much surface rust as possible and then used the Prep Step powder to clean and condition the remaining rust. Once it was clean and dry, we sprayed the entire area with Zero Rust paint.
Day 15 – Inner Cab Prep with Zero Rust Prep Step
Like we did on the frame and under side of the cab, we cleaned the inside of the cab with the Zero Rust Prep Step and got it ready for paint.
Day 21 – Rear Suspension Mods, A/C Unit Mockup, Engine and Tranny Mounts
Seems like another time warp, but in between Day 15 and Day 21 we spent a lot of time modifying the rear suspension in order to lower the truck. We were shooting to have the front of the running boards about 6.5″ off the ground and the rear of the running boards around 8″ off the ground, but the “bolt-on” rear leaf springs had the truck sitting with way too much rake for our liking. So, we flipped the front leaf spring mounts, notched the frame, and mounted them 4″ up inside the frame. We notched the frame and mounted the rear leaf spring hangers 4″ up inside the frame as well. This ended up giving us the stance that we wanted without using lowering blocks, and we still have plenty of clearance between the rearend tubes and the frame. As you can see, we didn’t modify the stock frame rails around the rearend at all, so the bed floor will still sit at a stock height.
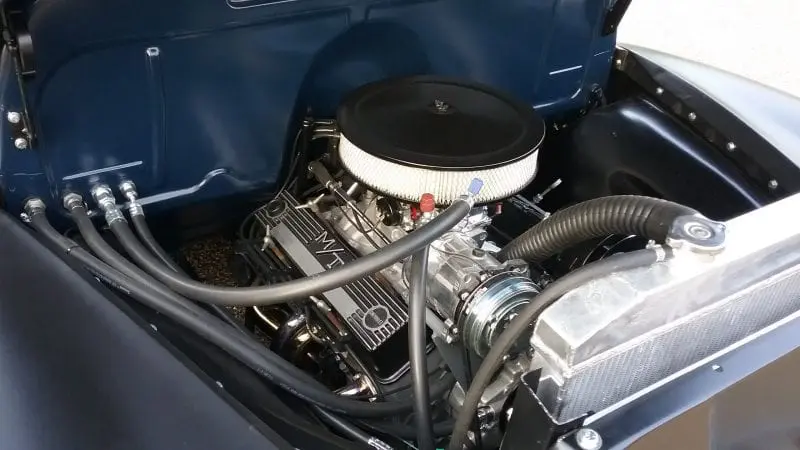
Today we made the brackets to mount our Southern Air A/C unit under the dash, and we also installed the engine and transmission mounts. For the engine mounts, we placed the engine as close to the firewall as possible, while leaving just enough room for the valve covers to be removed. This should give us enough clearance in the front to install a short water pump and still be able to fit a low profile fan on the radiator.
Day 24 – Getting Ready for Paint
We filled in a ton of holes in the firewall, some original, and some that looked to be made with the claw portion of a hammer. Even though we’re going with the patina look on the outside of the truck, we’re cleaning up the engine compartment and interior to make them look like better versions of what would have come from the factory.
Day 27 – Spray-on Insulation
We sent the truck out to have the firewall and inner cab painted, and we just got it back. We taped everything off and are spraying the whole inside of the cab with LizardSkin Sound Control and Ceramic Insulation. The Sound Control will really help reduce road and engine noise from entering the cab, and the Ceramic Insulation will reduce heat transfer from the firewall and floor into the cab, as well as from the sun baking on the roof. Even if we weren’t installing A/C in the truck, why not try to keep the heat out.
For the LizardSkin application, simply mix the product in its container, pour into the gun, and spray. It’s water-based, so cleanup is simple with soap and water.
Day 28 – Seat Reupholstery and Cable Routing
We have an original seat for the truck, and it is actually in good condition. The springs still have a lot of bounce and non of them are cracked, so we’re simply going to reupholster the seat. While cleaning up the seat frame we realized that the tension cable was almost completely rotten away, so we figured out how to reroute a new one and shot a video of that as well. We went with a designer series seat cover that has black vinyl for the boxing and bolster area, and charcoal tweed for the seating area.
Day 30 – Ready for the first show
Okay, the title may be a little misleading. We really pushed ourselves to get this thing put together for a World of Wheels show that we need to take it to. We were able to get the whole body painted or cleared, the seat cover and carpeting in, most of the weatherstripping and glass in, and the bed installed. We had a problem with backspacing on the new 18″ Detroit Steel Wheels that we ordered, so we had to pull wheels off of another truck as a temporary fix. It all came together and we rolled the truck into the show the next day.
Day ? – We took a hiatus
This Spring/Summer got a little busy around here, and Project 53 got put on the back burner. We’re finally getting back into it, with a goal of having it on the road come Spring of 2017. We have worked on it here and there, mostly late at night, so we’ll be posting some videos of the little progress that we’ve made. Since the last post from Day 30, we removed the front clip, freshened up and installed the small block, installed the transmission, installed a 17gal aluminum fuel cell, painted the wheels and mounted the tires, and tucked the rear bumper. We also started installed the Southern Air A/C unit. We’ll post some videos soon showing all of this work.
Can Lizard Skin Spray-On products be used on the exterior of a vehicle or as a floor covering?
The answer to both is absolutely yes! We get asked these questions on a regular basis, and the Lizard Skin sound control and ceramic insulation products can be used for both applications. Whether it’s in the inner wheel-wells, firewall, or under the floor and rocker area, the products can be used on the exterior of a vehicle.
They can also be used as an interior floor covering. A lot of people are removing the original carpet or vinyl flooring out of their jeep, truck, or van and are coating the floor with bedliner material to make it easy to maintain. This is a terrible idea as bedliner material is toxic and flammable. Even after it’s cured, bedliner material will continue to emit toxic fumes, which is the last thing that you want inside of your vehicle. The Lizard Skin product line is water-based, which means that there are no toxic fumes, and it’s non-flammable. Again, two qualities that you want when applying a product inside the cab of your vehicle.
It’s coming together
We’ve made some good progress over the last few weeks. The driveline is in and done, the brakes are done, and we’re finishing off the glass and weatherstripping. As happens with most builds, we’ve run across a lot of things that needed to be “tweaked”, or that required some custom fitting. We’re trying to keep the firewall as clean as possible, so routing cables and hoses has also been a bit of a challenge, especially since we added A/C. One thing that fit perfectly were the wheels, though. We went with 18″ smooth steel wheels from Detroit Steel Wheels. We’ll be posting more details about the truck once we get a few minutes, but this video shows a quick overview of where it stands now. Here’s an article on what we did to clean up the old Micky Thompson aluminum valve covers.
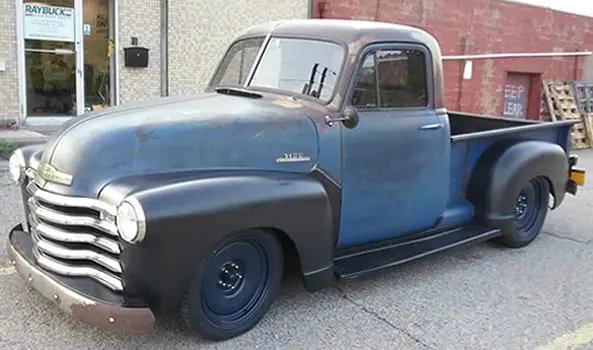
It’s Alive!
A few weeks back (June 2017) we finally got the 53 all together and out of the garage for its maiden voyage. There were a few little items to iron out, but all-in-all, it was a successful run. In the coming weeks we’ll be compiling and posting a list of all the parts and changes that went into this build, and we’ll shoot a video showing the final result.
Looking back on the build, it ended up being a bit more involved than what we had anticipated, but that’s usually how these things go. What we didn’t expect was how difficult it would be to align all of the body panels, specifically the whole front clip. These trucks have a lot of bolts…a lot! And, there are a lot of areas where three panels overlap and have to be aligned and bolted together. We spent about three days trying to figure out how to get the front clip to align. I’m not going to lie, we reamed a lot of holes, from the inner fenders, to the fender supports, to the hood hinge holes, and finally got everything really close. After bolting and unbolting the front fenders, grille, and hood several times, we found that positioning the hood first (with the fenders just loosely bolted in place), and then the fenders, and then the grille ended up being the way to go. The grille kept wanting to curve up on both ends, as though it was smiling at us. We ended up shimming the center of it and that took most of the curve out. My hat goes off to all the shops out there that build these trucks and get them to look perfect, as from the factory they surely were not.
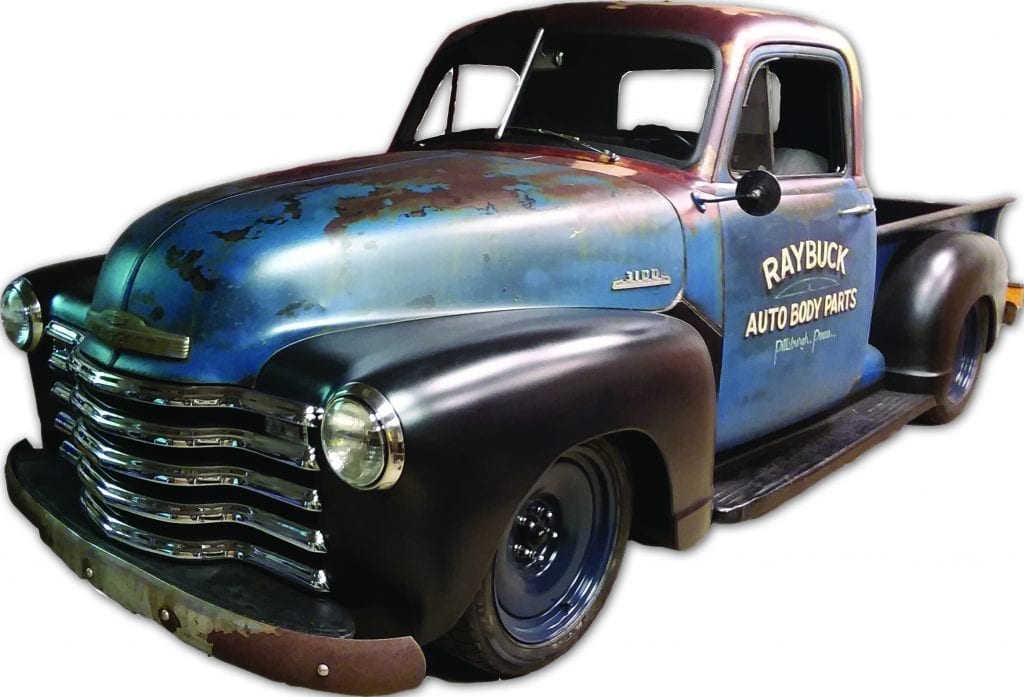
Here are some before and after pics.
Build Specs
Engine:
- 1969 Chevy 283 small block engine, stock heads, mild cam
- Summit Racing intake manifold (SUM-226102)
- Auto Meter 2370 (https://www.autometer.com/3-8-brass-npt-mechanical-temp-adapter.html) adapter for temp gauge connection to manifold
- Oil Pressure gauge tubing kit from Napa (https://www.napaonline.com/en/p/BK_7012154)
- Belts – Gates 7355 (13/32”x36-1/8”), Gates 7535 (13/32”x54-1/8”), Gates 7490 (3/8”x49-5/8”)
- Radiator Hoses – Dayco 81171 flex hose, Dayco 81231 flex hose
- Aluminum radiator with low profile electric fan and shroud from ebay (would not buy again as it had oddball fitting size for transmission line connections). Installed in-line adjustable thermostat to help regulate temperature.
- Summit Racing 600cfm street/strip carburetor with electric choke (SUM-M08S00VS) with 1” carb spacer.
- Speedway Motors aluminum SBC short water pump (910-15546)
- Summit Racing triple lower pulley (SUM-G3972B)
- Summit Racing double upper pulley (SUM-G3951B)
- GM one-wire alternator (SUM-811011)
- Summit Racing stainless shorty small block hugger headers (SUM-G9060-SS)
- Short header spark plugs (ACC 8198). These shorter spark plugs allow for better clearance of the spark plug boot so that it doesn’t rub against the headers.
Driveline:
- 700R4 automatic transmission. We started with a TH350, but after putting a few hundred miles on the truck, we realized that we needed overdrive. The TH350 is a solid transmission, but it holds the truck back on the highway. You can see the video about the swap here.
- 1970s Chevy 10 bolt rearend. Posi, 3.08 gears
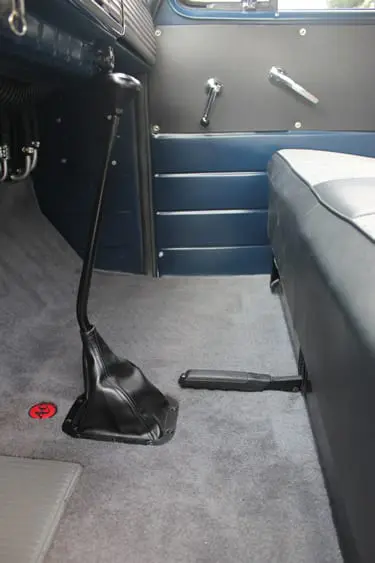
- Lokar CM700BXLB Midnight Series floor mount shifter (previous TH-350 shifter was XFMS6350BB), 16 inch , Lokar X70FMB shifter boot kit, Lokar BL1400U back-up light/neutral safety switch kit
- TV cable and bracket system from Bowtie Overdrives (https://www.bowtieoverdrives.com/)
Suspension/Steering:
- Heidts 1947-1953 Chevy pickup IFS Mustang II front suspension kit (CX-307-K) with 2” drop spindles and power rack. The kit states that you may need to notch the lower frame rails in order for the rack arms to clear. You absolutely need to notch it. Once installed the a-arms were at a steep downward angle, even after installing the engine and jumping up and down on the frame rails. We thought we might have to install a bump steer kit to correct for the angle but were told that the suspension would settle into place after the first ride. Once the truck was together and we took it for a ride, and hit a few bumps, the suspension settled right in and was perfectly straight across!
- The universal joint for this rack was a ¾”-36 with a .750” spline diameter and 36 splines.
- TCI 1947-1953 Chevy pickup rear leaf spring kit (432-4610-00). This kit bolts up to the original leaf spring mounting locations on the truck. When we test fit it, the truck sat too high for our liking. In order to get the stance that we wanted, without using lowering blocks or air bags, we cut the lower frame rail out of the chassis around each mount point and then modified the frame and mounts to allow this kit to be mounted to the top frame rail. Making this modification lowered the rear of the truck by 4 inches and still provided enough vertical clearance for axle travel. There was enough room to route the 2.5” exhaust up and over the axle as well. We thought we may need to replace the shocks due to the shortened travel, but we used the shocks that were supplied with the kit and they work well.
- Stock GM power steering pump with 90 degree fitting braised to it to allow for proper routing of pressure lines. Replaced the stock pressure valve on the rear of the pump with a Classic Performance Power Steering Slow Flow Valve (CPFCV-K). The GM power steering pump puts out more pressure than a Mustang rack likes. This valve will reduce the pressure, eliminating the overly touchy/sensitive steering that some cars have. It will also help prevent the rack from blowing out due to the higher pressure!
Brakes:
- 4 wheel disc brakes
- Front brakes – Part of Heidts kit, 11” rotors
- Rear brakes – Right Stuff GM 10 & 12 Bolt Rear Disc Brake Conversion 1970-74 Camaro/Firebird (965-AFXRD06) with 11.5” rotors and emergency brake setup.
- Under floor power brake kit. There’s a lot of travel with these kits, so the pedal sits a bit high. The pedal arm is heavy so we had to add a tensioner spring to get it to return to the full upright position.
- Dorman C93869 emergency brake cables
- Brake light switch (AAF-ALL76253) mounted to underfloor brake booster bracket
- 5/16” steel brake line
- Helix Suspension 23211 Universal Brake Residual Check Valve – 2 lb to rear brakes
- 1997 Volvo 850 emergency brake handle/mechanism mounted under seat and routed through front of seat riser.
Interior:
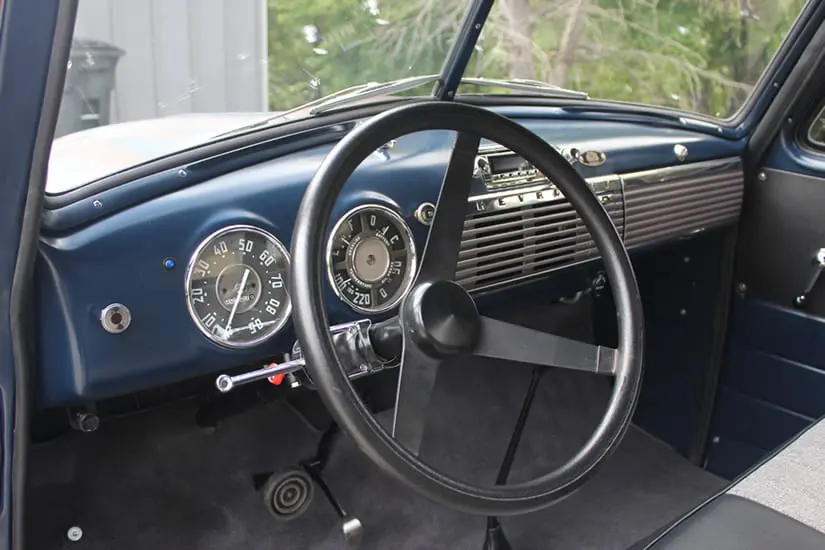
- Aftermarket 1st Series Pickup gauges. Used original gauge housings and one original gauge glass. Also used original multi-gauge faceplate/gauge divider as an aftermarket one was not available.
- Retrosound 1st Series Pickup Laguna radio and dual voice coil dash speaker with adapter bracket. This radio and speaker fit perfectly in the original locations and provided enough clearance for the windshield wiper arms and the A/C unit that we mounted under the dash, behind the glove compartment area.
- Grant steering wheel (GRT-332). We wanted to install an original-style steering wheel but couldn’t find one in a smaller diameter than what was stock.
- Ididit vintage steering column (IDT 1012360010) with horn kit (IDT-2612100340)
- United Pacific 5007R turn signal switch
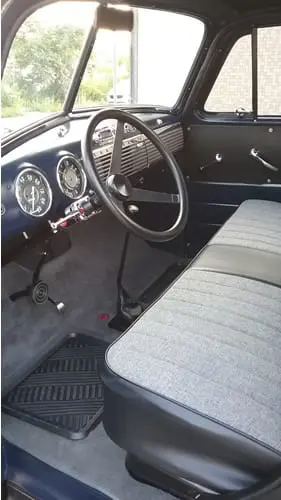
- ACC carpeting
- Seatz custom seat cover with 1” high density foam added. Black vinyl boxing/bolster and charcoal tweed.
- Jeep two-speed wiper motor and a modified 1954-style wiper knob to keep the wiper control where it would have originally been located on the top of the dash. We used 1954-1959 wiper arms since they were a better design than the earlier year wipers, providing better contact with the windshield and better water displacement.
- Southern Air Superfrost Heat & A/C kit (090-00523K). We used original style aftermarket throttle and choke knobs and modified them to work as the controls for the A/C unit. We mounted the heater control knob under the dash.
Electrical:
- Procomp Electronics wiring harness. This was an ebay purchase and was decent, but the fuse panel was sub-par. The wires in the kit were all clearly marked, and were long enough to reach everywhere they had to go. The fuse panel was clearly marked as well The main buses on the back of the panel, and the wire terminals in the panel were the problem. Removing any unused wires was a problem for three reasons: 1. Some were doubled-up on a terminal, 2. The connectors were difficult to remove, 3. Some of the buses required all terminals to be in place in order to extend the power.
Wheels/Tires:
- Detroit Steel Wheels 18×8” Steelie – 5×4.5/4.75 lug pattern with a 4.75” back spacing front (If building again, would decrease the back spacing by at least ½” to push the wheels out a bit)
- Detroit Steel Wheels 18×8” Steelie – 5×4.5/4.75 lug pattern with a 4.5” back spacing rear (perfect fit between the stock fender and inner bed side)
- Falken Ziex ZE950 P235/50R/18 front
- Falken Ziex ZE950 P245/55R/18 rear
Exhaust:
- Summit Racing 2.5” race mufflers. Center inlet and offset outlet.
- Flowmaster 15936 U-Fit Dual Exhaust Kit – 2.50 in. This kit included everything needed to build the custom exhaust and even had a few pieces left.
Body Modifications:
- Almost every hole in the firewall was filled to provide a clean look. Cowl vent drain was routed through interior of firewall and then out through the floor along with A/C drain line.
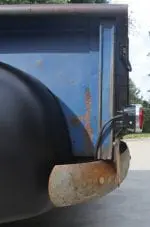
- The rear bumper brackets were modified to bring the bumper up and in since these originally sat really low and far out.
- A pair of LED backup lights were added just below the tailgate.
- The frame rail just behind the driver side a-arm was notched to allow proper clearance for the steering shaft and connectors.
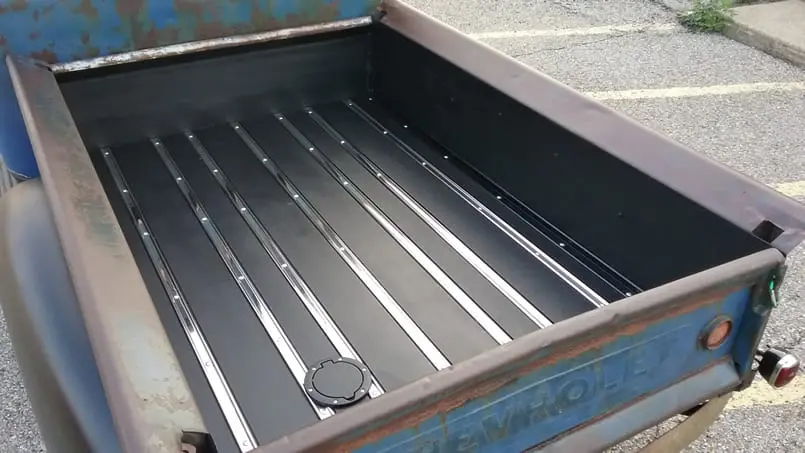
- Using original GM measurements we took 1”x6” and 1”x8” pine boards and cut and grooved them for the bed. A hardwood would have been used if the truck was going to haul any type of load.
Misc:
- Precision Replacement Parts weatherstrip kit (CWK111251)
- Precision Replacement Parts glass. Clear windshield glass and smoked side and rear glass (Click here to see the different styles of glass)
- RCI 17 gallon fuel cell (2172A). We moved the rear frame cross-member to the very rear of the frame rails to allow clearance for this fuel cell. We made our own mounts for it and it fit perfectly under the bed and between the frame rails. It also provided enough room on either side for the 2.5” exhaust to exit the rear of the truck. We mounted a Jeep Wrangler fuel door to the bed floor to allow access to the fuel cell.
- GM type adjustable (6”-24”) fuel level sender sending unit, 0-30 ohms
- Aligning the hood and front clip is not straightforward. Here’s an article on how to install the hood and align the front clip.


Really nice build on the truck, especially helpful with the details on parts used. I’m in the process of building out a 1953 1/2 ton as well. It has a TCI front end. I decided to install the driver side inner fender so that I could mock up the brake lines from the master cylinder. Noticed the interference between the fender and the shock tower/upper a-arm. I haven’t seen any pics on line on modifications and no one really discusses it. I have an idea how I want to cut it out, but would really like to see pics before I go too crazy. Was hoping you could share a pic or two of any modifications that were done.
Thank you
Ron
Hi Ron, yes, that’s definitely an issue. We cut part of the inner fender to help provide clearance for the upper control arm. I can’t attach the pics here, but I’ll send you a separate email with them. Essentially, we cut from the original shock cutout (the notch that’s originally in the lower center area of the inner fender) forward about 10″ (to just in front of the control arm).
Q: I have a 1995 Vandura G2500 5.7L. 8.5 rear end. I saw your video of replacing the 350 to a 700. I also would like to get better highway drive. Would this be something that you can do. What state are you located in. And about how much would this run to be installed. Thank you great video.
Thanks for your question John, but we just sell parts here. These project videos are for our own vehicles. We don’t offer any fab or mechanical services.
I have a 1953 Chevy 1/2 ton like yours that needs to be rebuilt. I want to keep it stock. What kind of cost is a person looking at to have it done or to do it themselves. My problem not a lot of room.
Hey Ted. The cost can vary widely depending on how extensive the restoration needs to be, and how much you can do yourself vs having a shop do. I’ve seen daily drive-type restorations that were in the $10-20k range, and I’ve also seen $50k restorations.
nice truck i have a few k trucks, were did you buy shifter boot all the ones on market all split in a few years for trans. and tranfer case shift levers . thanks frank
Thanks Frank. The shifter boot is also from Lokar. So far, after a few years, it’s still looking like new.
Great looking build. I’m currently doing the same year. What type of headers were used for this? I have a 350 sbc in mine and have been worried about clearance issues.
Thanks. These are standard SBC shorty headers. You can get similar from Summit, Jegs, Speedway, etc. They allow for clearance of the steering components, etc.