A Step-by-Step Guide to Installing Truck Rust Repair Panels
Rust is one of the biggest threats to the longevity of a truck. It weakens structural integrity, affects appearance, and, if left untreated, can lead to costly repairs. Fortunately, rust repair panels offer a cost-effective way to restore a truck’s body without replacing entire sections.
At Raybuck Auto Body Parts, we specialize in high-quality rust repair panels designed to fit various makes and models. Whether you’re restoring a classic truck or maintaining a daily driver, replacing rusted panels can extend the life of your vehicle and improve its value.
This guide walks you through the process of installing rust repair panels, from assessing damage to welding and finishing the job. By following these steps, you can complete a professional-grade repair and protect your truck from further corrosion.
Key Takeaways
- Rust repair panels restore truck integrity – Replacing rusted sections prevents further damage and extends the lifespan of your truck.
- Thorough assessment is crucial – Identifying the extent of rust helps determine whether sanding, sealing, or full panel replacement is necessary.
- Proper tools ensure a smooth installation – Essential tools include an angle grinder, MIG welder, clamps, and rust-resistant coatings.
- Precision in cutting, fitting, and welding is key – Proper alignment and secure welding ensure a seamless, durable repair.
- Preventative measures stop future rust – Regular cleaning, rust inhibitors, and undercoating help protect your truck from corrosion.
Tap test your truck for rust! 🔧 If a rusted section crumbles when you tap it with a screwdriver, it’s time for a replacement. Rust repair panels offer a durable, cost-effective fix that extends your truck’s life. Don’t wait until it’s too late!
Understanding Rust and Its Impact
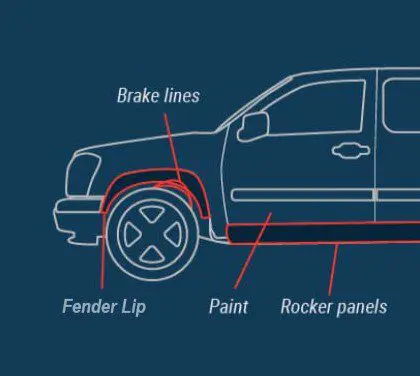
Rust forms when metal is exposed to moisture and oxygen, creating iron oxide. Trucks in regions with high humidity, road salt, or frequent rain are especially prone to rust, particularly in areas like:
- Rocker panels
- Wheel arches
- Cab corners
- Floor pans
- Fenders
Over time, rust spreads, weakening the metal. Surface rust can sometimes be treated with sanding and sealants, but deep rust that compromises the metal’s structure requires panel replacement. Rust repair panels are designed to restore these damaged areas efficiently, providing a strong, durable solution that maintains your truck’s value.
Assessing the Damage
Before starting any repairs, inspect the rusted areas thoroughly. Identify whether the rust is superficial or if it has penetrated through the metal. Use the following methods:
- Visual Inspection: Look for bubbling paint, discoloration, and flaking metal.
- Tap Test: Tap the rusted area with a screwdriver or hammer. If it crumbles, it’s time for a replacement.
- Light Test: Shine a flashlight from behind the panel. If light passes through, the rust is severe.
If the damage is beyond simple sanding and priming, replacing the rusted panel is the best course of action.
Gathering Necessary Tools and Materials
Having the right tools is essential for a smooth installation process. Before beginning, gather the following:
Tools
- Angle grinder with cutting and grinding discs
- Wire brush or sanding disc
- MIG welder
- Clamps and vise grips
- Measuring tape
- Marker or scribe
- Drill and spot weld cutter
- Body hammers and dollies
- Respirator, safety glasses, gloves
Materials
- Rust repair panels from Raybuck Auto Body Parts
- Seam sealer
- Weld-through primer
- Automotive-grade primer and paint
- Body filler (if necessary)
- Undercoating or rust inhibitor
Having all these items ready ensures an efficient and professional-quality repair.
Preparing the Work Area
A well-organized workspace leads to better results. Start by:
- Parking the truck on a level surface and securing it with wheel chocks.
- Removing trim, moldings, or components obstructing the rusted panel.
- Cleaning the surrounding area with a degreaser to remove dirt and contaminants.
- Ensuring proper ventilation, especially when welding or applying coatings.
If possible, work indoors to avoid temperature fluctuations and debris contamination. Having ample lighting will also help ensure precision when cutting and welding.
Removing the Damaged Area
To replace the rusted panel, follow these steps:
- Mark the Cutting Line: Use masking tape or a marker to outline the area to be removed.
- Cut Away the Rusted Section: Use an angle grinder or air saw to cut along the marked line. Avoid cutting too much; it’s easier to trim more later if needed.
- Remove Spot Welds: If the panel is welded, use a drill and spot weld cutter to detach it from the frame.
- Clean the Edges: Grind the edges smooth to prepare for the new panel installation.
Test for Fitment: Before proceeding, test-fit the new panel to ensure proper alignment.
Fitting the Replacement Panel
With the old rusted section removed, it’s time to position the new panel:
- Align the Panel: Place the repair panel in position, ensuring it fits flush against the surrounding metal.
- Clamp in Place: Use clamps or vise grips to hold the panel in position before welding.
- Trim if Necessary: If the panel is slightly oversized, trim the edges for a perfect fit.
- Mark the Weld Areas: Identify where the new panel will be welded to the existing metal.
Proper fitting is essential for a seamless repair. If needed, make small adjustments to ensure there are no gaps or misalignments.
Welding the New Panel in Place
Secure the repair panel with a strong weld to ensure durability:
- Apply Weld-Through Primer: Coat the edges to protect against future rust.
- Tack Weld First: Begin with small tack welds spaced apart to avoid warping.
- Stitch Weld the Panel: Use short, controlled welds to minimize heat distortion.
- Grind the Welds: Once cooled, grind down the welds to create a smooth, seamless finish.
- Check for Gaps: Ensure there are no gaps or weak points in the welds.
A strong, even weld ensures the panel remains securely attached and structurally sound.
Finishing Touches
With the panel welded in place, it’s time to refine the repair:
- Apply Seam Sealer: Protect the seams from moisture intrusion.
- Sand the Surface: Smooth out any rough areas.
- Apply Primer and Paint: Match the existing color for a factory finish.
- Use Undercoating: Add protection to the underside to prevent future rust.
These finishing steps ensure a long-lasting repair that blends seamlessly with the rest of the truck.
Preventative Measures
To keep rust from returning, take the following precautions:
- Wash the truck regularly, especially in winter months.
- Apply a rust inhibitor to high-risk areas.
- Use undercoating to protect the truck’s underside.
- Keep drains and seams clean to prevent moisture buildup.
Rust prevention is key to maintaining your truck’s condition and avoiding costly repairs in the future.
Conclusion: Truck Rust Repair Panels
Installing rust repair panels is an effective way to restore a truck’s integrity and appearance. By following these steps, you can achieve professional-quality results and extend your vehicle’s lifespan.
At Raybuck Auto Body Parts, we provide high-quality, precision-fit rust repair panels designed for various truck makes and models. Whether you’re a DIY enthusiast or a professional restorer, our products help you complete the job efficiently and effectively.
Browse our selection of rust repair panels today and get the parts you need to restore your truck with confidence.
Have questions? You can call, email, or chat with us online, and we’d be happy to help you find the parts you need to fix your truck.
Upgrade your truck with high-quality, precision-fit rust repair panels from Raybuck Auto Body Parts—shop now for durable, affordable solutions that keep your vehicle looking and performing its best!
Further Reading
- The Importance of Regular Vehicle Maintenance: A Guide For Every Car Owner: This guide emphasizes the significance of routine vehicle maintenance in ensuring safety, performance, and longevity.
- Preventing Rust on Your Truck: Essential Tips and Tricks for Long-Lasting Protection: Explore essential detailing tips to protect your truck from rust and corrosion, ensuring its durability over time.


