Rust and damage along the wheel arch are among the most common—and most neglected—issues affecting vehicle bodies. Once corrosion takes hold, it can spread rapidly, compromising structural integrity and leading to costly repairs down the road. Addressing rust the moment it appears not only restores the arch’s appearance but also prevents further deterioration of adjacent panels.
At Raybuck Auto Body Parts, we supply precision-stamped wheel arch repair sections engineered to simplify installation and maximize longevity. Our panels feature corrosion-resistant EDP coatings and factory-matched contours, enabling enthusiasts and professionals alike to replace damaged areas with confidence and ease.
Key Takeaways
- Early rust repair prevents structural damage: Addressing wheel arch corrosion promptly stops rust from spreading and avoids costly long-term repairs.
- Wheel arches trap moisture and debris: The design of inner wheelhouses and outer arch skins creates an environment where rust can form from the inside out.
- Accurate inspection ensures proper repair: Identifying whether surface rust or deeper damage exists helps determine if full panel replacement is needed.
- Raybuck panels simplify installation: OE-style contours, EDP coatings, and included flange tools make repairs faster, cleaner, and longer-lasting.
- Proper prep and welding matter: Clean cuts, stitch welding, and thorough undercoating help preserve fit, finish, and rust resistance.
Modern cars use foam in wheelhouses to dampen noise—but that foam traps moisture and accelerates rust from the inside out. Know what’s hiding behind your fenders.
Why Wheel Arches Rot Out
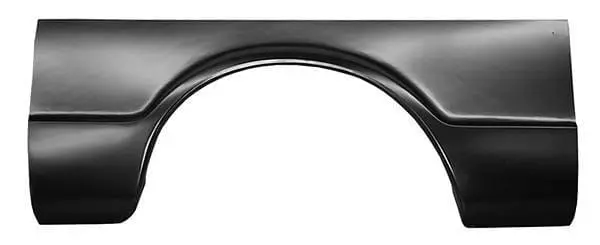
Wheel arches are especially vulnerable to rust because they sit at the junction of road debris, moisture, and chemicals. Two main pieces comprise the wheel opening:
- Inner Wheelhouse: Shields suspension components but traps road salt and mud in the cavity.
- Outer Arch Skin: Forms the visible fender lip but offers limited drainage.
When paint chips or sealant erodes, water and salt penetrate the gap between inner and outer panels, creating a micro-environment that accelerates corrosion. Modern vehicles often include foam insulation inside the wheelhouse to damp noise; however, that foam absorbs moisture and concentrates it against bare metal, allowing rust to initiate from the inside out. Without timely intervention, surface pitting evolves into through-holes, weakening weld flanges and threatening panel alignment.
Identifying Damage: Inspection and Assessment
A thorough inspection is the first step toward a successful repair:
- Early Signs: Look for bubbling paint, blistering clearcoat, and small rust flakes along the arch’s edge.
- Surface Rust vs. Penetration: Light surface rust can often be wire-brushed and sealed; deep pitting or holes demand panel replacement.
- Scope of Replacement: Determine whether only the outer arch skin needs swapping or if the inner wheelhouse’s spot-welded flange must also be removed.
Accurate assessment ensures you order the correct Raybuck repair section and avoid rework down the line.
Tools and Materials Needed
Equip your workspace with the following essentials:
| Tool / Material | Purpose |
| Angle grinder with cut-off wheel | Precision cutting of old panel |
| Spot-weld drill bit | Safe removal of inner wheelhouse spot welds |
| Raybuck flange tool | Forms consistent flange on repair panel |
| Welding equipment (MIG/TIG) | Seamless joining of new panel to existing structure |
| Body filler and spreader | Smooth transition between old and new metal |
| Automotive primer and paint | Corrosion protection and factory-matched finish |
| Respirator, gloves, eye protection | Essential personal safety gear |
All steel repair sections from Raybuck Auto Body Parts are heavy-gauge, pre-coated with electro-deposition primer, and stamped to OE contours for an exact fit.
Preparation Steps

Proper preparation streamlines the repair process:
- Position Vehicle: Park on a flat surface, engage the emergency brake, and chock the opposite wheels.
- Remove Obstructions: Take off the wheel, fender liner, trim, and any flares covering the arch.
- Clean and Mark: Degrease the area, wire-brush away loose rust, and outline cut-out boundaries on both old panel and new Raybuck section using pencil and tape.
A clean, well-marked work area reduces cutting errors and helps maintain proper alignment between old and replacement panels.
Removing the Rusted Section
Execute panel removal with precision to preserve surrounding structure and flange:
- Maintain Flange Integrity: Leave at least 10–15 mm of solid metal around the spot-weld flange to serve as a welding anchor.
- Dual-Cut Technique: Align the new Raybuck panel against the old arch; mark matching cut lines on both to ensure perfect fit.
- Drill Out Spot-Welds: Use the spot-weld drill bit to eliminate inner wheelhouse attachment points without damaging the new panel.
- Control Heat Warping: Make multiple small cuts rather than one long pass. Let the metal cool between cuts and avoid grinding excessively near weld flanges.
By following these steps, you’ll preserve alignment and minimize surface distortion, paving the way for a seamless join.
Fitting and Welding the Repair Panel
Accurate fitting and welding are critical for both appearance and strength:
Test-Fit Panel
- Clamp the Raybuck section in place with C-clamps or vice grips.
- Check that gaps match OEM specifications (typically 2–3 mm).
Form Flange
- Use Raybuck’s flange tool to bend the repair panel’s lip, matching the factory angle.
Choose Welding Method
- Flange Welding: Simple and forgiving, uses the formed flange to lap over original metal.
- Butt Welding: Offers a flush finish but requires precise edge preparation.
Welding Best Practices
- Use stitch welding—small 10–15 mm welds spaced evenly to manage heat.
- Alternate sides of the panel to prevent warping.
- Grind each bead flat before proceeding to the next to maintain panel contour.
Grinding, Filling, and Finishing
Once welded, blend the repair into the vehicle’s surface:
- Grind Weld Beads: Use a flap disc on the angle grinder to level welds flush with surrounding metal.
- Apply Body Filler: Spread a thin layer of polyester filler over minor irregularities; let cure fully.
- Sand Smooth: Progress through 120, 220, and 400-grit sanding blocks for a seamless finish.
- Primer and Paint: Apply 2–3 coats of automotive primer, sand lightly between coats, and finish with factory-matched base and clear coats.
- Protect Inner Panel: Scuff the EDP-coated inside surface and spray with rubberized undercoating.
Undercoating and Rustproofing
A thorough undercoat repels moisture and extends repair life:
- Use a high-build rubberized liner sprayed across inner wheelhouse cavities.
- Pay special attention to edges and flanges, where water tends to collect.
- Consider a wax-based cavity-seal product applied via nozzle for hard-to-reach spots.
- Allow all coatings to cure per manufacturer instructions before reassembling trim and wheel.
Maintenance and Prevention Tips
Keep rust at bay with simple routines:
- Regular Cleaning: Hose out wheel arches monthly to remove salt and gravel.
- Visual Inspection: Check for new paint chips or bubbling every three months.
- Touch-Up Paint: Carry a small pot of matching enamel to quickly seal chips.
- Protective Wax: Apply a thin coat inside the arch lip each winter for added water resistance.
Conclusion: Wheel Arch Repair Sections
Timely wheel arch repairs safeguard your vehicle’s appearance and structural integrity. With Raybuck Auto Body Parts’ precisely stamped, EDP-coated repair sections, even complex arch replacements become straightforward. Our panels extend beyond common rust zones, ensuring ample metal for solid welding and long-term protection. Whether tackling surface pitting or through-holes, you’ll find the exact panel to match your make and model in our extensive catalog.
For expert advice, detailed fitment information, or to place an order, visit Raybuck Auto Body Parts online or contact our customer support team—your success is our priority.
Further Reading
- How to Prevent Exterior Rust on Your Car: A practical guide outlining essential maintenance steps—like regular washing, waxing, and touch-up techniques—to protect your vehicle from rust.
- Cathodic Protection: An overview of cathodic protection techniques used to control the corrosion of metal surfaces, applicable to various structures including vehicles.


need repair panel for 99 Bonneville